 In a follow-up to my first post about “Studio Anywhere” I’m once again venturing far away from my usual posts around Street- and Travel Photography to try my luck at some portrait photography, this time using my daughter Sarah as my model. To see more of our “shooting” and learn how this studio-like portrait was taken on a 1m stretch of white wall inside our rented apartment’s bedroom continue reading after the jump.
During a recent trip to the USA (where often in the evening I visit a Barnes & Noble Bookstore to look at Photography books) I stumbled across the stunning book “Studio Anywhere” by professional portrait and commercial photographer Nick Fancher (link to the book at the end of the post). Nick gave up his rented studio after discovering that he can just as easy get professional results working directly at his customer’s location with minimalistic portable lighting gear, be it a small one bedroom apartment, an office, a backyard or a garage. The book describes in details many examples of his shootings including his setups, lighting diagrams, interaction with models and many behind the scenes shots that illustrate very well is approach to get professional studio-like results with minimalistic gear and in any type of location. Nick also describes his post production steps in Adobe Lightroom.
Very much inspired by the book I decided to use our vacation time to try some of Nick’s concepts myself in whatever our rented holiday apartment gave me. In this second post I’m showing my initial tries using flash with my daughter Sarah as my model and first the bedroom of our apartment, then the outdoor terrace as the makeshift “studio”.

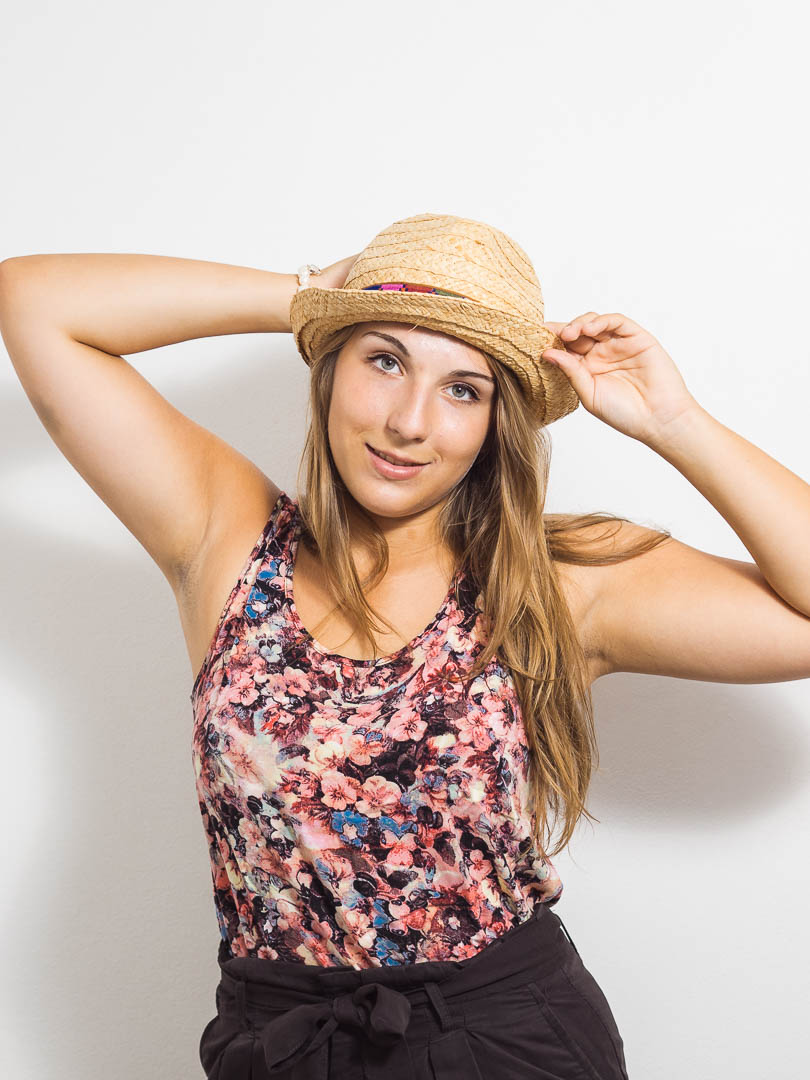
As you can see from the “making of” shot above the setup was super simple. I positioned Sarah in front of a one meter stretch of more or less blank white wall in the bedroom of our holiday apartment. I used of camera flash set to 1/8 power on a lightstand shot through a white umbrella, the easiest to use light modifier, casting a soft light on the model, but also creating a nice catch light in Sarah’s eyes. As camera I used the Olympus OM-D E-M1 with the m.Zuiko 45mm f/1.8 prime lens. Exposure was 1/125 sec (my starting point for flash photography) at f/3.5 and ISO 200. As flash I used a Yongnuo Speedlite YN560 IV with a Yongnuo RF603C II receiver and a Yongnuo YN560-TX Flash Controller attached to the hotshoe of my Oly.

I converted the RAW shots in Lightroom CC. For the two portraits above I increased overall exposure by a half stop and cranked up the contrast to give the image some punch. To compensate for the increased contrast I opened up the shadow quite a bit plus added sharpening (as I shot in RAW). To warm the image a bit I decreased saturation of blue and cyan in the HSL panel. Finally I adjusted the curves in the red and green channels only.
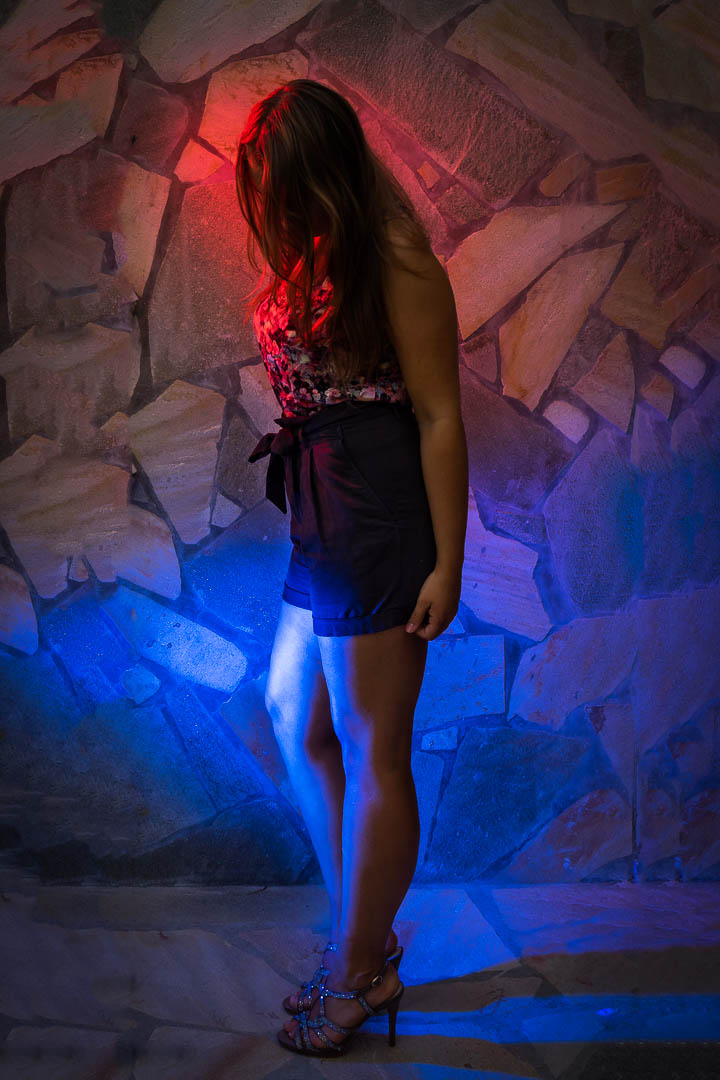
For the image below I positioned a second flash on a small tripod slightly behind and to the left of Sarah with a red gel attached. Power here was set to 1/4. You could argue that the color cast is too strong, but Sarah liked it and we didn’t want to spend too much time to play around with various flash positions and settings (it was super hot and the pool outside was waiting)…..

The set below we shot on the terrace of our holiday home. I positioned Sarah in front of a narrow strip of rock-tiled wall. With a two flash setup with colored gels I wanted to get a shot with some extravagant atmosphere.

The outdoor images were taken with the Olympus OM-D E-M1 and the m.Zuiko 17mm f/1.8 at 1/250 sec, f/10 and ISO 200.
After cropping to eliminate the light stands and the doorway there as only a very narrow image left. I did an export to Photoshop, extended the canvas left and right to regain a 4×6 ration. selected the “new” empty areas, hit delete and selected “content aware fill” so Photoshop on its own filled the empty parts of canvas with the colored rock tiles. Overall it did a pretty good job, I just had to clean a few to obvious spots. After re-importing into Lightroom the rest of the adjustments were pretty straight forward. I cranked up the contrast to give the image some punch and boost saturation. To compensate increased blacks I used an adjustment brush just on her skirt to open up the shadows and make the textures visible. Ten I did some sharpening and added a vignette. Done.
I don’t consider myself a portrait shooter, for that I have far too much to still learn. This shooting as well as the first one (link to my post of episode 1 with a portrait shooting of my son below) was more a kind of experimental sessions. But I like the concept of being able to shoot decent portraiture without a studio, on location and with very little equipment.
I hope you liked also this second little off-topic excursion into portrait photography. I’ll be once again travelling to the US next week (my 8th trip this year) and hope to pick up Nick Fancher’s new book Studio Anywhere Part II.
Have a great Sunday
Marcus
Related Links:
Nick Fancher : Studio Anywhere
Related Posts:
Off Topic – Studio Anywhere Part 1
Gear Talk – Ring light on a budget
A Street Photographer’s Business Card
Nice Photos, love the first one!
I have a new blog: photozbyrubyslens.wordpress.com, I would love to get you as a follower! Thanks.
Thanks, Ruby, really appreciate your comment 🙏😊! I already checked out your blog and follow 👍!Marcus
Thank you Marcus, studio everywhere is a great idea indeed! Sarah is a very very cute model – and I still have no clue how you do it all with your work and travel. Pff.
Thanks, I’ll pass it on to Sarah 🙂 Photography and blogging is my way to unwind. I’m not a big sleeper, that helps as well 😉 Have a good weekend, Natasha! And I really liked your Instagram portrait 🙂 !
Lovly tutorial! 🙂
Thanks, really appreciate your kind feedback! Marcus
Love the experiment and sometimes you just stumble across some great surprises when you explore. I like the color gel background as well. Great pictures and your daughter is beautiful 😉❤️
Thanks so much ! Sarah will read your conment and this will surely put a big smile on her face!
Sehr coole Serie und sehr spannend auch mit den Enstehungsbildern… Das Portrait mit dem roten Licht find ich besonders gelungen! Gerne mehr davon 😉
Danke, das Lob von so einem etablierten Porträt-Fotografen wie Dir tut sehr gut 😊
Ach komm, “etabliert” ? ;-)) Aber ist tatsächlich meine ehrliche Meinung, ich mags und würd mir mehr in der Richtung wünschen!
😀 ich sehe Deine Serien sehr sehr gerne an, das hat für mich schon Vorbildcharakter! Aber ich werde meine Mädels daheim schon mal wieder engagieren 😉
Vielen Dank! Das freut mich! Bin gespannt was da noch kommt 😉 Wenn die Models schon in der Familie sind….
Feine Sache, dass schon ein zweiter Band von Herrn Fancher rauskommt. Ich hatte mir den ersten Band auf Grund der Empfehlung hier besorgt und bin nicht enttäuscht worden. Habe zwar noch nichts wirklich ausprobiert, aber das Buch liest sich insgestamt so gut und die Erläuterungen wirken sehr ein-leuchtend.
Und die Bilder hier sprechen ja außer für Euch beide u.a. auch für das Buch 🙂
😀😀Danke. Werde von Band 2 berichten wenn ich ihn habe….
bin gespannt!
Great pics again! Especially the last one, it has mystery
Thanks do much, glad you like it!
Looking forward to seeing more of your work. Some excellent images. You just can’t beat portrait photography…….catching a person and a moment for all time.
Thanks for the feedback! I’m only learning to do this properly. Have a great day!
Your daughter is such a pretty girl. Lovely photos.
Thanks so much ☺️!
very nice
Thanks 😊👏