Approaching Easter Sunday, The Significant Other and the Kids diligently colored some Easter Eggs. I decided to work on a photographic Easter Egg for myself, trying a technique I read about on the web but have never explored so far. For a bit of how to continue after the jump….


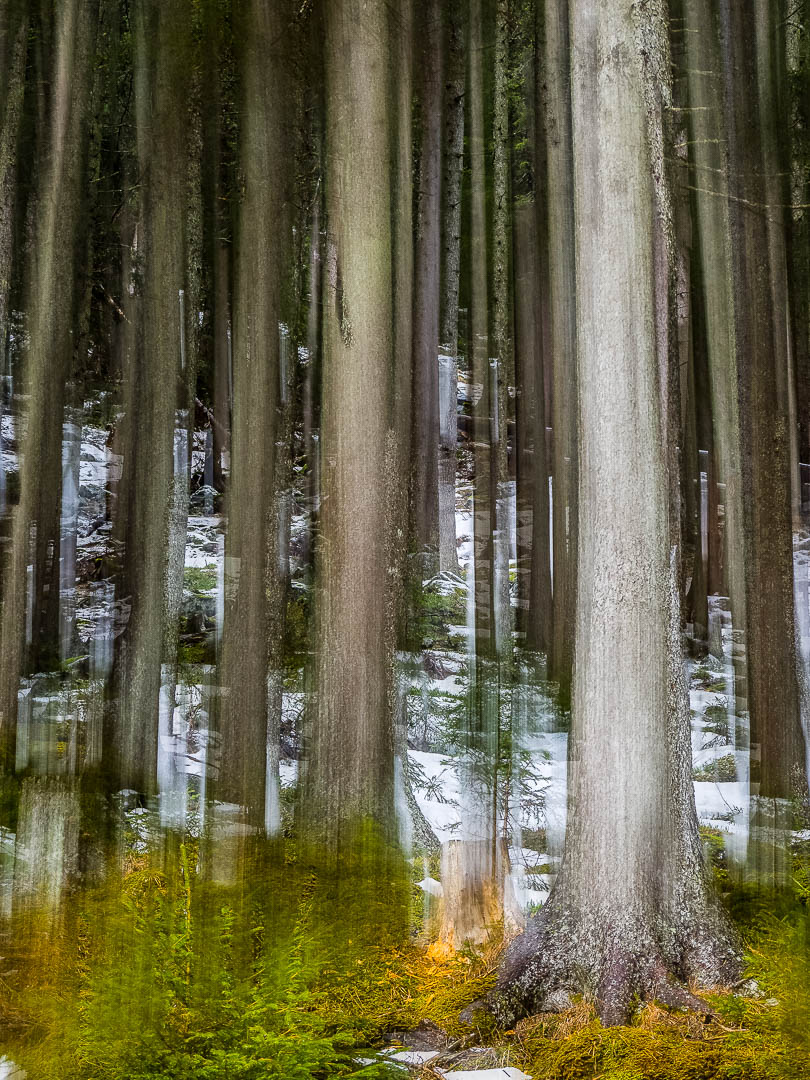
The goal was to combine a normal still photograph with a motion blurred version of the same scenery. For that I took first a still image of a mountain forest scenery (specs are 1/60 sec @ f/4.5 and ISO 200), then a long exposure image while panning the camera upwards (specs are 1/8 sec @ f/13 and ISO 200), with both images having the same focal length of 38mm. See the original RAW files above.
After import of the RAW file in Lightroom CC Classic I sent them over to Photoshop, copying the sharp image as separate layer on top of the blurred image, manually lining up the tree trunks (as I shot hand held the images did not exactly match). I then created a layer mask and with the black brush “painted” through the sharp image to reveal the blurred trunks from the layer underneath. My goal was to have blurred trunks above a somewhat sharp ground, and also some sharp areas between the blurred trunks. I played around until I liked the results.
After re-importing in Lightroom Classic CC, I increased contrast, saturation and played a bit with the curves. Done….
My personal little Easter Egg 😉
It might not be to everyone’s taste, but I felt good creating some art. And this is all that counts for me.
The same effect can be used on a variety of backgrounds, also with people, buildings, street scenes etc. If you’ve created similar art, share your results via the comment section.
Wish you all a great and creative Saturday!
Marcus
Related Posts:
Instant Inspiration (15) – Long Exposure Waterscapes
This is awesome!
Danke, Michael, so much appreciated! Marcus
I enjoyed this post. You put a creative spin on easter egg painting. 🙂 I liked the blurred effect .
Thanks, glad you like it! Try it yourself, it is quite fun! Marcus
Interesting
This is such an interesting concept. I don’t know if it’s done by the same process, but another blogger had a similar conceptual series. I don’t know if you’ve seen his work. Edlehming.wordpress.com. He’s using a new technique now, but if you look back about 4 posts, he has created photos with this blur technique as well.
I’m still busy learning how to do “regular” stuff. 😉
Glad you like it! Thanks for pointing out the other blog, will check it out!
It would never occur to me to play around with my images like this — but obviously I’ve been missing out! Thank you for a great “how to” post, and an equally great image.
You are welcome, Heide. Our passion photography is full of creative surprises! Marcus
well done. And a good tutorial.
Thanks for the great feedback! Marcus
Curious!
🙂